

What Does Andromeda Look Like Through A Camera Phone?
Hello David,
You tin certainly get a long manner with cellphone photographs these days. Particularly wide-field astrophotos like this. Your raw DNG file has all the required information. To bring out some of the detail you need to adjust some of the parameters that influence the histogram of intensity values.
You may desire to start past seeing what exactly you can import from your DNG file:
Import["andromeda-raw-original.DNG", "Elements"]
This will give y'all a listing of all the available import elements for this particular file.
{"BitDepth", "CameraTopOrientation", "Channels", "ColorProfileData", "ColorSpace", "Data", "DateTime", "EmbeddedThumbnail", "Exif", "FilterPattern", "FlashUsed", "GeoPosition", "GPSDateTime", "Graphics", "Paradigm", "ImageSize", "MakerNote", "MetaInformation", "RawData", "RawExif", "RawImage", "RedEyeCorrection", "Summary", "Thumbnail"} Lots of metadata! Of these, you might similar to try
Import["andromeda-raw-original.DNG", "Summary"]
for a brief summary of main backdrop of the image, or you tin can retrieve whatsoever specific properties using
Import["andromeda-raw-original.DNG", {{"DateTime", "GeoPosition"}}] (Be aware that your GPS location when yous took the photograph is embedded in the file...)
To become the paradigm nosotros tin can use
dng = Import["andromeda-raw-original.DNG", "Image"];
The dimensions of the image are
ImageDimensions[dng] {3024, 4032} so we run into that this is the full 12MP image (3024 x 4032 pixels).
The Mathematica function ImageAdjust volition be useful to shift the histogram of intensity values. Here is the histogram using the zero (no aligning) ImageAdjust parameters, {0,0,1}:
ImageHistogram[ImageAdjust[dng, {0, 0, 1}]] When you run this you volition see that near of the image intensity values are less than 0.1 (as you lot might look in a by and large black image). We can utilise a very crude aligning in lodge to see some detail. (Y'all will notice that your histogram shows three colours (RGB, in this case) considering this DNG has three channels - attempt ImageChannels[dng] - the adjustments below may likewise be applied separately for the different channels.)
Then, we'd like to do two things: increase the effulgence of the image (basically multiply each pixel intensity value), and adjust the dissimilarity (primarily to shift the blackpoint of this image - although there are other ways to achieve this too).
Firstly, lets just brighten the prototype:
ImageHistogram[ImageAdjust[dng, {0, half-dozen, 1}]] You lot will detect that the histogram is now 'fuller'. Values that ended upwards larger than 1 are clipped to ane. If yous wait at the prototype that this adjustment generates
ImageAdjust[dng, {0, 6, ane}] you will detect ii background features quite hands: the halo in the lower third, and the cloudy glow in the upper third. The halo is an artefact of the image. I'd guess that the dominicus had simply set (~6pm on December 21st) in Seattle, with atmospherically diffracted light possibly causing this optical event. Other sources are nearby streetlights, etc. Tricky to remove this though without interfering with the smashing actual astronomical feature that y'all captured in the upper third: the Galaxy! (One way to avoid having sun-related optical effects is to have the images well subsequently twilight has ended.)
We can shift the "blackpoint" of the epitome in a number of means (to darken the background sky i.e. reduce sensor noise). One possible way is to introduce a contrast adjustment (the first value in the ImageAdjust parameter list):
ImageHistogram[ImageAdjust[dng, {i.5, 6, 1}]] or even with a bit of gamma correction
ImageHistogram[ImageAdjust[dng, {1.5, six, 1.01}]] The diffraction halo is even so very articulate, but the Milky Way is now a little clearer too.
Y'all can read more on the parameters in ImageAdjust hither.
Using a combination of functions you lot can get rid of the halo, just it unfortunately also removes the background Milky way. For case,
ImageSubtract[dng, 0.03] // ImageAdjust; processed=ImageAdjust[%, {.4, 4, one.04}] will requite y'all a pretty good wide-field view of the stars in your epitome. (ImageSubtract has been used hither to roughly adjust the blackpoint.)
And for the portion that involves Andromeda,
ImageTake[processed, {2050, 2640}, {660, 1350}] gives 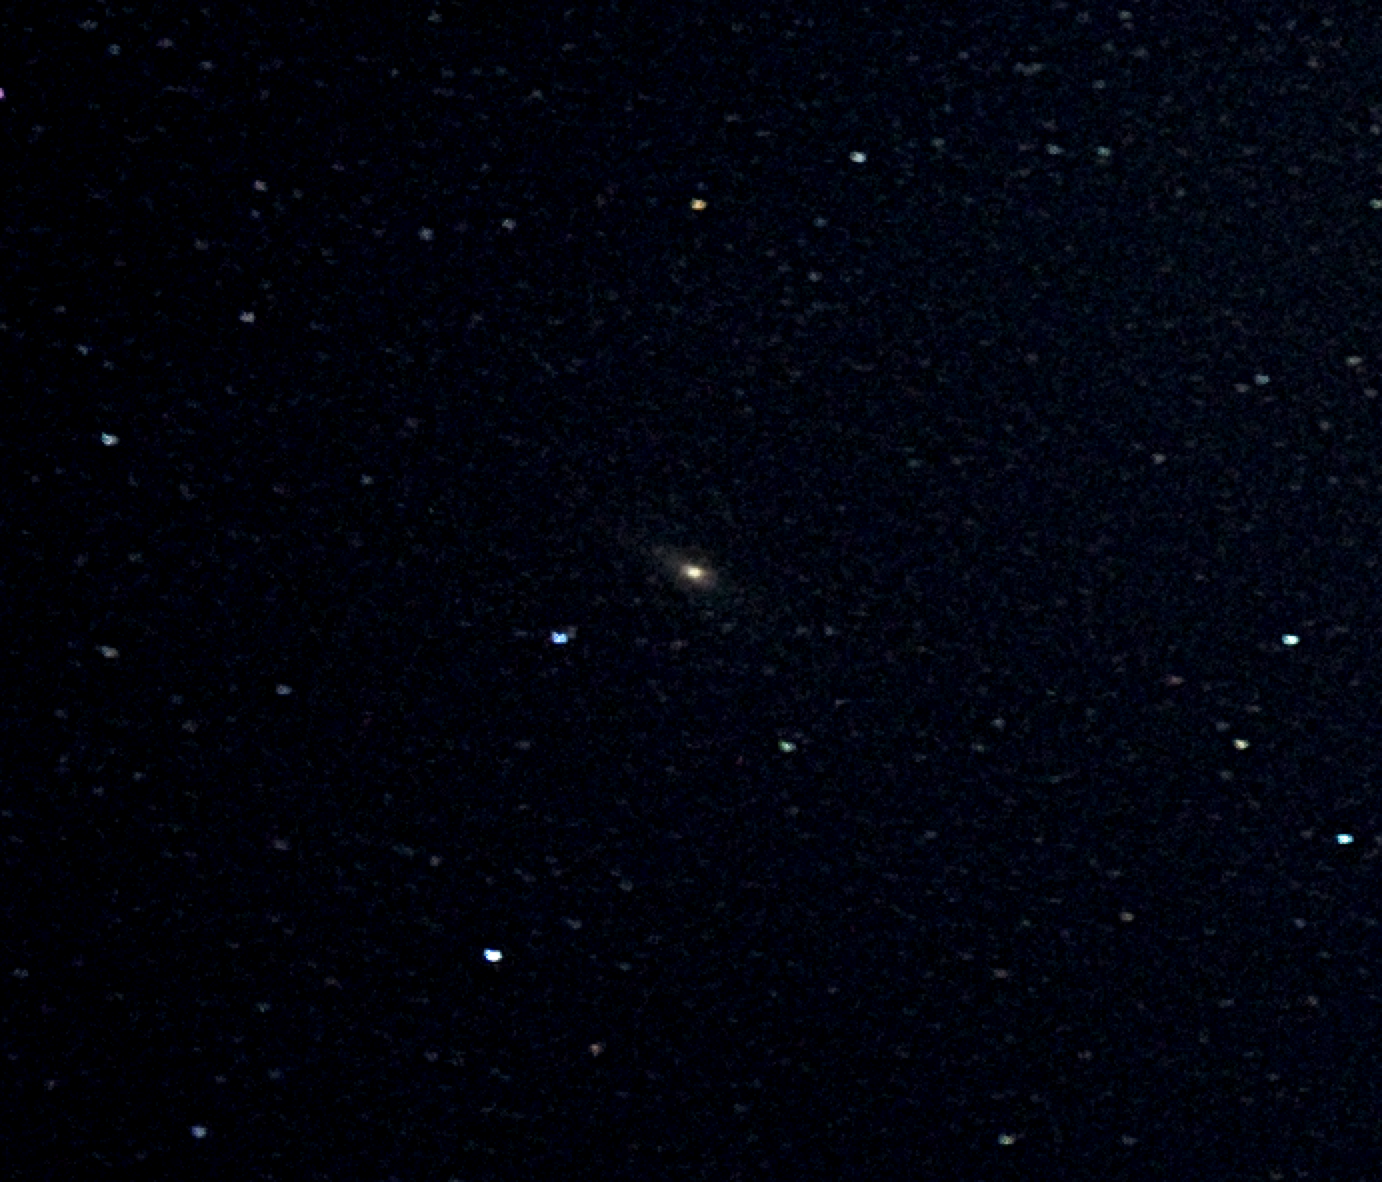
Source: https://community.wolfram.com/groups/-/m/t/2215936
Posted by: bairdanowbod.blogspot.com
0 Response to "What Does Andromeda Look Like Through A Camera Phone?"
Post a Comment